

Hello guys.!
Today I will will set up a COPYBOT!.
The COPYBOT is a slave of the master bot. It will follow its master around and copy everything it does.
This can also be called a “Master- Slave Robot” project.
I’ve used here one master robot and one slave robot. However after completion of this project, you can attach as many slave robots with the master robot.
COMPONENTS REQUIRED ->
1x Arduino uno
1x Bluetooth Module (I used HC-05)
2x Chassis
2x Breadboard
1x RF transmitter Module
1x RF receiver module
4x Wheels
4x Motors – (100 rpm DC motor)
2x 9v batteries
2x L293D (Motor driver IC)
A lot of connecting wires
For controlling your master robot wirelessly, you need a remote. You can turn your phone into an IR remote by building a simple app in MIT app inventor. For novice’s, here is the link where you can learn how to build the app.
https://www.youtube.com/watch?v=li9YaUactCw
https://www.youtube.com/watch?v=li9YaUactCw
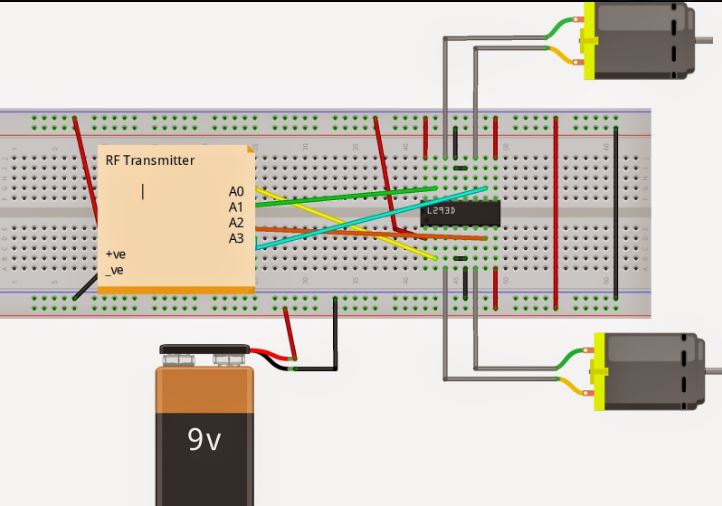
CIRCUIT DIAGRAM :-
1. MASTER ROBOT
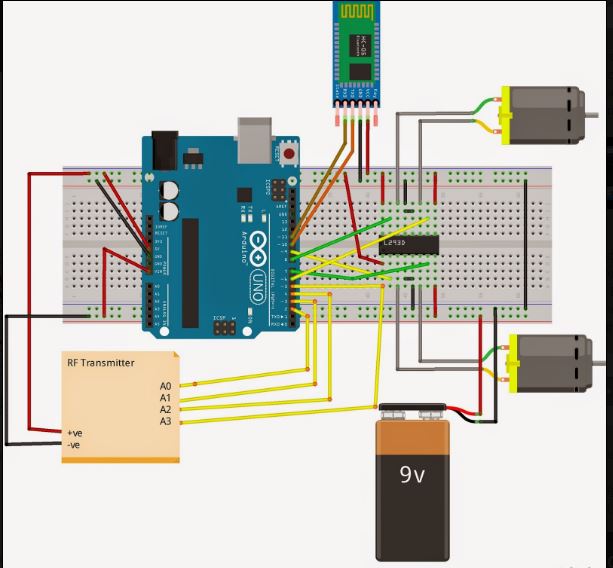
1. MASTER ROBOT
2). SLAVE ROBOT :-
//Now you need to connect your arduino UNO to the computer and upload the following code.
//CODE#include <SoftwareSerial.h>SoftwareSerial BT(10, 11); //TX, RX respetivelyString COMMAND;void setup() {BT.begin(9600);Serial.begin(9600); // setting baud rate to 9600pinMode (2, OUTPUT);pinMode (3, OUTPUT);pinMode (4, OUTPUT);pinMode (5, OUTPUT);pinMode (6, OUTPUT);pinMode (7, OUTPUT);pinMode (8, OUTPUT);pinMode (9, OUTPUT);}void loop() {while (BT.available()){ //Check if there is an available byte to readdelay(10); //Delay added to make thing stablechar c = BT.read(); //Conduct a serial readCOMMAND += c; //build the string- “forward”, “reverse”, “left” and “right”}if (COMMAND.length() > 0) {Serial.println(COMMAND);if(COMMAND == “forward”){digitalWrite(8, HIGH);digitalWrite (9, HIGH);digitalWrite(6,LOW);digitalWrite(7,LOW);digitalWrite(2, HIGH);digitalWrite (3, HIGH);digitalWrite(4,LOW);digitalWrite(5,LOW);delay(100);}else if(COMMAND == “reverse”){digitalWrite(8, LOW);digitalWrite (9, LOW);digitalWrite(6,HIGH);digitalWrite(7,HIGH);digitalWrite(2, LOW);digitalWrite (3, LOW);digitalWrite(4,HIGH);digitalWrite(5,HIGH);delay(100);}else if (COMMAND == “right”){digitalWrite(8, LOW);digitalWrite (9, HIGH);digitalWrite(6,LOW);digitalWrite(7,LOW);digitalWrite(2, LOW);digitalWrite (3, HIGH);digitalWrite(4,LOW);digitalWrite(5,LOW);delay (100);}else if ( COMMAND == “left”){digitalWrite(8, HIGH);digitalWrite (9, LOW);digitalWrite(6,LOW);digitalWrite(7,LOW);digitalWrite(2, HIGH);digitalWrite (3, LOW);digitalWrite(4,LOW);digitalWrite(5,LOW);delay (100);}else if (COMMAND == “stop”){digitalWrite(8, LOW);digitalWrite (9, LOW);digitalWrite(6,LOW);digitalWrite(7,LOW);digitalWrite(2, LOW);digitalWrite (3, LOW);digitalWrite(4,LOW);digitalWrite(5,LOW);delay (100);}COMMAND=””;}} //Reset the variable
That’s it!. Now upload this code to your arduino and start the robot. You don’t need any additional code for the slave robot.
THANKYOU!

Awesome man!
LikeLike
Thank you
LikeLike